The Guardian's Role
Brrokk Barrowbane
2nd August 2013
Introduction
This is my short guide to fellowship play in LOTRO as a guardian.
An important caveat is that it’s my view from my own experience.
I’m not really a great expert, I’ve just done it a lot. I
usually try to avoid jargon, but here I’m more interested in
keeping things short. I call the guardian “he” throughout,
with apologies in advance to players of female characters.
It’s mostly about the role of a guardian as main tank in a
fellowship. Other roles are possible (off-tank; special bosses; solo
play) and adjustments must be made for these. Basically, the
guardian’s job in a fellowship is to make sure that he’s
the one getting hit, and be so tough that the hits have little effect.
He doesn’t particularly deal damage; the rest of the group do
that. If the guardian does his job, no-one dies, and he’s the
only one with a repair bill.
When playing in a fellowship, the guardian’s two important tasks are:
(1) Take and keep aggro.
(2) Stay alive.
You might think I should reverse the order of those. How can the
guardian keep aggro if he’s dead? But the point is that these are
his jobs in a fellowship.
Keeping the guardian alive is the healer’s job! The healer
can’t do this job if the guardian loses aggro because he’ll
then be getting hit. As guardian, it’s necessary to get on with
your job and assume that everyone else will do theirs too. An effective
fellowship is one where everyone has this kind of attitude.
In this article I’m not going to write detail of which virtues to
equip and what the best pieces of equipment are. These things change
with every game update and I’m not an expert anyway. Instead,
I’m describing the general principles I’ve come to
understand over six years’ play in the hope that they help you
make your own build and equipment choices.
Taking Aggro
Taking aggro, like anything else, is done in two stages. First,
character build and equipment. Second, firing off the right skills in
the fight. For character build, threat is the obvious thing to enhance.
This is mainly done through the legendary guardian’s belt
legacies and possibly some jewellery items. On the guardian’s
belt, shield use is important as well as direct threat. Some legacies
and relics on the weapon can also enhance threat.
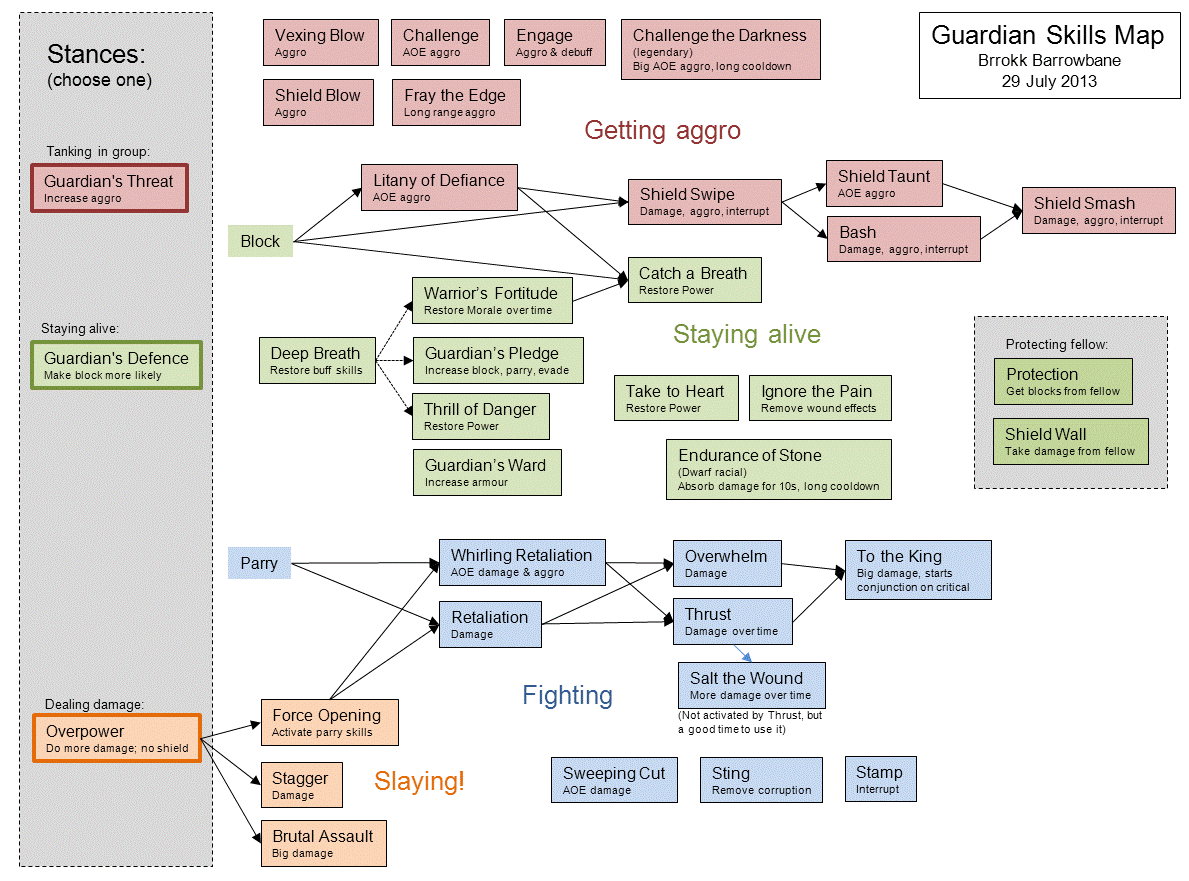
For skills, see the diagram at the end of this article. I imagine
guardian skills in this diagram, where each row of skills can be
roughly travelled left-to-right when circumstances activate them.
The obvious stance to be using is Guardian’s Threat.
To take aggro at the start of a fight, Challenge
is the most obvious choice. But one can also just run in and start
hitting if the rest of the fellowship are willing to show some
restraint. Or it’s possible to pull from a distance, either by
shooting an arrow or using Fray the Edge.
Pulling lets you decide where the fight will take place and it can be
good to separate one or a few mobs from a bunch. It’s also a good
approach with trolls as you can make sure knock-backs don’t throw
you where you will activate more mobs or over cliffs. On the other
hand, with a lone troll, it may be better to run straight between his
legs, turn and start hitting. This makes sure he faces away from the
rest of the fellowship and doesn’t AOE them.
A hint for dealing with knock-backs: The /follow command can be bound
to a key (I use the F key). Once the fight is underway and you
have aggro, hit F to stay with the troll. If he knocks you, you will
start returning in mid-air with instant reaction and not overshoot.
Once the fight is underway, in a good fellowship you need to spam aggro rather than do damage. Vexing Blow and Engage are good ones. I try to keep Challenge
in reserve once it’s cooled down, but use it if you’re sure
things are under control. Others are activated by circumstances: use Litany of Defiance and the block-activated shield skills whenever they become available.
The rest of the time, unless AOE is a bad thing for some special reason
(stunned mobs nearby; reflective damage), spam blows just to make the
bad guys angry. Sweeping Cut is the obvious option. Whirling Retaliation
has a bonus effect: it reduces everyone else’s threat making
yours greater in comparison. In a long fight with multiple mobs it may
be worth switching target now and then to get hits on neglected ones.
For this reason, it’s rarely worthwhile having the guardian in a
fellowship as RAT, (and the guardian doesn’t always follow RAT).
It’s always good policy to arrange the fight with the mobs facing
you and everyone else behind them. This keeps your fellows from being
hit by any AOE, and also lets you see imediately if any mob leaves you
to go after someone else. A wall or pillar behind you helps with
knock-backs.
Keeping Aggro
If you use those threat skills enough, you shouldn’t have
much trouble enraging all your foes, but it’s always worth
keeping something in reserve in case a mob leaves you and goes after
the healer. Useful skills at this point are Challenge (if you’ve kept it and you’re close enough) or Fray the Edge which has a nice long range of effect. The real emergency one is Challenge the Darkness which can solve anything, temporarily. After firing that off in a big fight, go straight to the staying alive skills!
The boss is usually your main target although some fellowships will
like you to keep aggro of everything. If a single mob goes off after
someone else, though, it’s not always a problem. The usual
fighting method has the group picking off mobs one by one while you
keep the boss. In that case you will see those mobs leaving you, but
the DPS guys should be able to handle them. Just keep your healer safe
so that he can keep you safe. Finally you are facing just the boss and
everyone else is hitting him too; another great triumph is imminent!
Staying Alive
This is also done in two stages, at design time and in the fight.
First, the primary character stats. Again, these things change with updates, but in general it’s possible to say that:
- Vitality is your most important stat. It increases your morale and makes you resistant to damage.
- Might is the second most important. It also resists damage.
- Fate and Agility are of moderate importance. Fate gives in-combat morale regen; Agility helps you land blows.
So for equipment, choose pieces which add to Vitality and Might,
maybe also Agility and Fate. Armour value is obvious. There are a few
useful items like the Great River bauble which gives a temporary
shield, although this may now be superceded by Wildermore items. Then
there are block/parry/evade and mitigations.
In order, your ways of avoiding damage are:
- Evade: you dodge the blow. Guardians are not usually light enough on their feet to get a lot of benefit from this.
- Parry: you stop the blow with your weapon. Might helps you
do this. There’s also a partial parry, where you prevent only
some of the damage.
- Block: you stop the blow with your shield. This is the guardian way! There’s also partial block.
- Armour reduces the effect of the blow.
- Mitigations also reduce the effect. You have both physical
mitigation for direct blows and tactical mitigation for fire damage,
freezing, etc.
After taking damage, incoming healing helps your healer restore
you. (Getting the picture? As guardian there’s “the boss
and the mobs”, “your healer” and then “the rest
of the group”).
Mouse-over the stats and mitigations on your character sheet to gain understanding of them.
So, into the fight. Well, just before a tough fight gobble down some
food which gives Vitality or Might and some restoration food and soup,
and maybe put Protection on a DPS comrade or healer. Hope and scrolls
also help. In the fight, besides spamming aggro, keep an eye on your
morale bar and the boss’s morale bar. You want to see his going
down faster than yours, although progress may be slow at the start of a
fight if the rest of the fellowship are occupied taking down mobs. If
things are going badly, use whatever options are available in between
aggro skills:
- Guardian’s Ward
- Guardian’s Pledge
- Warrior’s Fortitude
- Morale and restoration potions, wound potions etc.
The diagram below should make the timing of these clear.
In a real emergency there’s Endurance of Stone
if you’re a dwarf. That staves off defeat for about 10 seconds,
which may be long enough for the fellowship to turn things around.
That’s a good one to use after Challenge the Darkness if Guardian’s Pledge isn’t available.
After using Guardian's Pledge I immediately use Deep Breath if it's available as it resets Guardian's Pledge for a next use.
Other Roles
What if there are two guardians in the group, or a warden?
Agreement before the start of a fight is essential; there’s no
point fighting each other for aggro. One guardian should be in
Guardian’s Threat and spam all the aggro. The other should play
“off-champ” and go DPS in Overpower. Two guardians can put Protection
on each other to get more block responses. In order to fill this kind
of role, I keep a two-hander weapon in my bag. The other guardian will
take all the hits so I won’t need my shield at all. It’s
worth having the purpose of this second weapon in mind when equipping
its legacies: give it Might and Agility and extra finesse rather than
Vitality. (Finesse reduces your opponent’s mitigation).
Some would re-trait to fill this role. This can increase the damage
output quite a lot for a guardian, but it’s expensive and you
need to know well in advance when you’re going to need it.
I’m hoping that the next big update will give us trait tabs like
the war horses to help with this.
Solo play is possibly the most annoying part of being a guardian.
Dealing damage is slow but the danger from landscape mobs is small. I
find myself running about trying to aggro as many mobs as I can, just
to speed things up. Trait tabs may help here too.
Finally
(1) Keep Aggro
(2) Stay alive
Baruk-Khazad! May all your bosses have magnificent treasure chests!

